
I wasn't aware of the fact, at least until recently, that it is possible to construct reasonably flexible web load tests using Visual Studio. Now, to be fair, I haven't had a solid opportunity to use a best-of-breed load testing tool such as Smartbear, so I don't really have anything to compare my experience to.
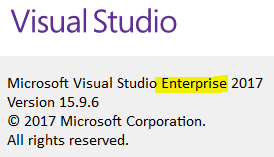
As much as the Microsoft Load Testing tool is now officially deprecated (and therefore probably not something worth leaning on in future), it does come "for free" if you have a licensed copy of Visual Studio Enterprise. So the obvious disclaimer here: please don't be disappointed if you don't find this stuff in Visual Studio Professional, since it's only for Enterprise. If you have an MSDN subscription, however, this should not be a problem since you get access to pretty much everything.
Assuming that you're blessed and have Visual Studio 2017 Enterprise, you can then proceed to the next step of making sure that you've got the web testing bits installed.
If you try to create a new project in Visual Studio, and you don't have access to the following template: "Web Performance and Load Test Project", then you're going to need to check a box in the installation wizard.
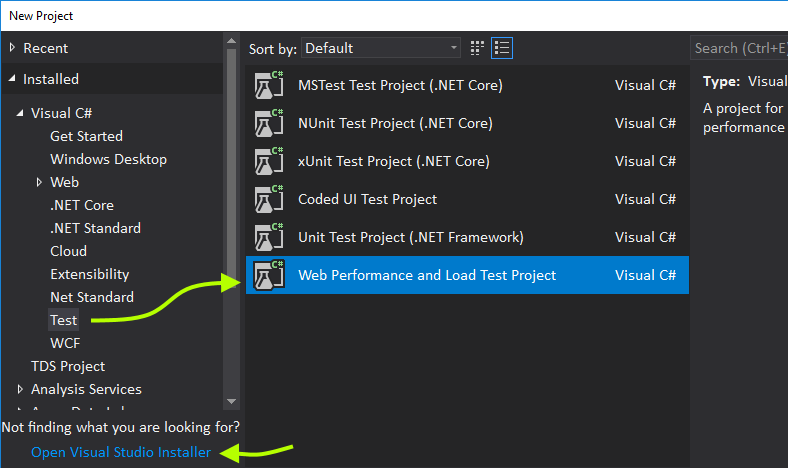
Fortunately, if you don't see the template, there's a convenient link to open the visual studio installer. Visual Studio usability has improved vastly over the years.
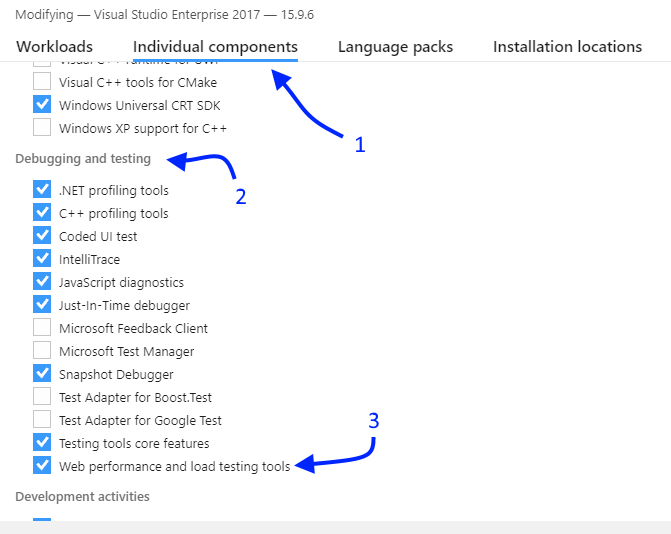
Once the installer appears, you're going to need to:
- Select the "Individual Components" tab;
- Scroll down to "Debugging and testing";
- Ensure that "Web performance and load testing tools" is checked.
Assuming you've managed to install all the bits for creating a new performance and load test project, once created, everything is fairly discoverable. Some idioms:
- An interaction with a site (or, for that matter, number of sites), is known as a "web test". Web tests comprise requests with some validation rules.
- A load test is constructed by referencing one or more web tests, and then setting some behaviour characteristics (e.g., how the load is applied). Fortunately, there's a neat wizard for setting up the basics for a load test, including cloud specifics.
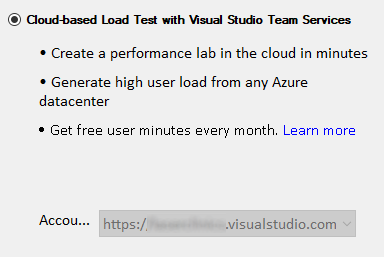
In other words, in order to construct a load test, you need to already have constructed at least one web test. Once that depedency is sorted, to get the load test to use the cloud for the agents and controller (which I will refer to as the "load test infrastructure" from here on), just make sure that "Cloud-based load test with Visual Studio Team Services" is selected in the first page of the load test creation wizard.
Of course, the accounts will be of the form https://<account>.visualstudio.com, and this is a deprecated tool, so reference will be made to "Visual Studio Team Services" as opposed to what it's called now, i.e., Azure DevOps.
The second page of the wizard will ask for a location from-which the test should be conducted—at the bottom, there will be a link for help on using your own VM (or more than one) to actually do the requesting during the load test (acting as a so-called agent). Now, unless otherwise configured (details further down), use will be made of the Cloud Load Testing (CLT) infrastructure to do the heavy lifting in respect of actually applying the load. In this case, you're going to need VUMs, that is, Virtual User Minutes. Fortunately, you're given a free start of 20,000 VUMs. If you go over that limit, you start to get charged per VUM. You can avoid the whole VUM pay-as-you-load-test thing by using your own servers, either on-site or cloud-based VM's.

Prachi Bora has put together a neat article on setting up your own load test infrstructure and has linked to various ARM templates for creating selected profiles of infrastructure (e.g., dynamic IP-based, or static IP-based) in Azure.
The original reason for this article was some pain that I experienced in using the default CLT to load test a customer's SaaS-based application. With the default load test infrastructure, you (unsurprisingly) don't get to choose the IP that clients come from, so any kind of whitelisting of your load-test infrastructure becomes a bind.
To the rescue: the static-IP template referenced from Prachi's article. There's even a button on the Github page that, once clicked, connects through to the ARM template form in Azure for provisioning the rig. The parameters prompted-for include the subscription and authentication information needed to connect to the relevant Azure DevOps subscription/project. The instructions are good, so I'm not going to go into the detail here. The only outstanding magic component to the whole deal is to configure your created Visual Studio .loadtest project to use the dedicated rig as opposed to the default CLT infrastructure.
It took some time for me to find how to do that, but in the end it turned out to be all-too-easy:
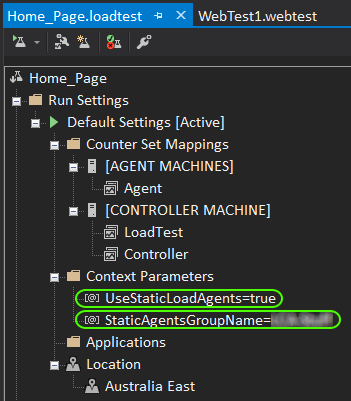
You'll need two so-called context parameters as part of the load test configuration, namely:
- UseStaticLoadAgents, set to true;
- StaticAgentsGroupName, set to the name of the agents group that you created with the ARM template (the name is a parameter that you're prompted for, which, if not entered, defaults to the associated Azure resource group).
That's it! You should now be able to execute the load test, have the rig that you've set up actually run the tests, and have the results reported both in Visual Studio as well as in your Azure DevOps subscription. To summarise, provided:
- You have a Visual Studio Enterprise license;
- You ensure that the context parameters needed to reference your dedicated rig are correctly set up as part of the load test.
... using Visual Studio to run load tests is a relatively painless exercise. That is, until (Visual Studio 2019)+1, at which point this whole thing will become unsupported.

Comments !